Friday, January 31, 2014

Kids Clothes Week!

*image from blog.kidsclothesweek.com*

Sheesh, this week of sewing has gone by fast!  My day three project continued into day four and is being posted for day five.  It took me longer to complete this because I made up the pattern as I went.  It's not complicated AT ALL. Seriously, ANYBODY could do it.  But I'm not so good at making it up as I go.  

I made a circle skirt apron.  I LOVE how it turned out.  Especially for my first go at it.  I took notes to change for future aprons, because there WILL be future aprons of this.  It came out so cute!


It has that 50's vibe that makes my heart melt!!  Oh love it!  

I got the lemon fabric at JoAnns FOREVER ago specifically for making an apron but never got around to it.  


She was pretty excited to have this apron made special just for her. :)

Not too bad for a first go of it!  I think now that I have it all figured out I could whip one out in less than an hour.

I think I will try to get one last thing finished before the end of the weekend!  Last day of Kids Clothes Week is Sunday!  Have you popped over there to see all the super cute things people are making? 

Go check out Day Five! And all the others while you're there.  

Wednesday, January 29, 2014

Kids Clothes Week!

*image from blog.kidsclothesweek.com*


For day two of KCW, I whipped up a shirt for Kels.  The Flashback Skinny Tee from Made By Rae.  Every pattern I have purchased from Rae has been fantastic.  Simple, easy to follow, and great results! You can buy the big kids size (6-14!) or the smaller sizes (12 months -5T).  Kelsey measured out perfect for the 5T.


The fabric is a really light weight, SOFT knit from Girl Charlee. I was nervous to work with it because I haven't been real successful sewing with knits yet.  I went REALLY slow, pinned the heck out of it, and used the stretch stitch on my machine.  And all was well in the world.


I was really happy with the length of the sleeves.  Store bought shirts seem to be the TINIEST bit short on her arms.  This pattern length worked really well for her arms.  


The length on the waist turned out well too.  She can reach up without her tummy showing.  :)  

Now onto pattern drafting for my day three project!  

Wish me luck!

Tuesday, January 28, 2014

Kids Clothes Week!


*image from kidsclothesweek.com*

I was hoping and wishing that I would have time to participate in Kids Clothes Week this year.  I usually sit back and watch all the beautiful things everyone is posting.  This year, I decided, I'm all in!  And I am so pleased that I have been squeezing it into our fairly busy schedule.  It just happens to be the week that we have  no parties or anything!  :) SCORE!

Really, the goal is to sew for kids (yours or someone else's) for an hour each day this week.  Whether that means you only get something cut out and started or you finish multiple items. 

So my day one project actually got completed ALMOST in day one.  I really wanted to take my time and not rush through it to see how much I could accomplish this week.  I want the things I am making to be special and really show time and effort.  Because that's what makes sewing worth it, I think. 

I chose to make The Sweetheart Dress from Very Shannon.  I have had this in my "want to sew" pile for quite some time now.  Then, the perfect situation arose.  Not only is it Kids Clothes Week, but we are celebrating Allie's birthday on February 15th.  Her party will be Valentine theme.  Ummm, couldn't get better.  So I went to JoAnn's and found fabric to go along.  I love it.  Red and grey but not hearts or too Valentine like.


It is similar to the Geranium dress except this has a fun surprise on the back.


A heart cut out!  How cute is that??  And perfect for a Valentine's party!  


I mean seriously!  So cute!!  I just need to put the button on it where that needle is.  I am going to attempt a fabric covered button in the grey lining fabric.  I will also add a flower embellishment on the front waist as well.  But I'm saving those little details for the weekend.  

The skirt is enclosed in the lining so there are no itchy seams, one of my favorite features.  If a pattern has this feature I am almost certain to buy it!  


I am so excited to take her 3 year old pictures in it!  

Day Two for Kids Clothes Week was also successful!  I'll post about that tomorrow!  :)  

Are you joining in the sewing festivities?  What are you making?

Wednesday, January 22, 2014

Amazing Carpet Cleaner

I am amazed at everything lemon oil can do!  I love how much I'm learning about it.  

This week was a serious shocker! I really wasn't expecting this to work.  But work it did!!

Are you ready for it?


I know, I know…really, Shannon?  This really isn't that amazing.  You can find recipes similar to this ALL OVER Pinterest.

But you would be wrong, because they are missing the most important ingredient and don't work NEARLY as well!  I've tried MANY natural, DIY carpet cleaners and they just don't compare to this.  From just baking soda and vinegar, to adding in some dish soap, to ironing it after spraying it.  None of them worked.

I LOVE my puppy.  Adore her.  I am so happy to have her.  She is my baby.  But, she made a few stains on the girls' carpet that I could not get out.  I got so annoyed every time I would see them.  Those little puppy pee spots, mocking me!

I don't know why I hadn't thought of this before.  But I am so glad I finally did.  The mocking is gone!  I won this battle!!  :)

So here is what you will need:
Lemon essential oil (therapeutic grade)
Baking soda
Vinegar
Water
Spray bottle
dish for mixing
hand towel

Process:
Put some baking soda into your little mixing dish.  Couple teaspoons maybe. Add in some drops of lemon oil - I added 7 or 8 drops.  Mix it around so the baking soda absorbs the oil. It will start to look and feel like cornstarch.


Now mix equal parts water and vinegar into a spray bottle.

Go find that spot and ignore it's mocking.


There it is…..kinda blending in and definitely mocking all at once. Ignore it!

Go ahead and put your baking soda mixture on it.


Rub it in really well.  You want it to get into the fibers pretty well so it lifts the stain out.
And this stain has been here a good amount of time…..


Remember where the spot is.  It's hard to see it once your baking soda is all rubbed in.  Then give it a good spray with your vinegar and water.  Let it bubble and do it's thing.  Once the bubbles seemed to have calmed down, rub it out with a hand towel!


And there you have it!  Stain is gone!! Oh happy, HAPPY day!

If you don't have a stain to remove but want to freshen your carpet up a little bit;  sprinkle the baking powder and lemon mixture onto your carpet.  Let it sit for a few minutes to absorb all the stinky smells and then vacuum it up.

Easy everyday use for a fresh carpet!

*You can order your therapeutic grade lemon oil from Young Living directly, or email me and I can get some shipped to you! (paterson.shannon@gmail.com)*

Monday, January 20, 2014

The Gardening Season Begins


FINALLY!!  It is time to start seeds!  

Well, actually, I started them last week. 

I'm so excited about them.  The only ones that I have done so far are the slow to germinate herbs along with a few that will do good in the spring frosts.  

Here's what I've started:
    Cilantro (which I'm pretty sure the cat destroyed)
    Sweet Marjoram (no idea how to cook with/eat it, but chickens benefit from it)
    Basil
    Parsley
    Mint
    Spearmint
    Sage
    Chives
    Lavender
    Oregano
    Celery
    Onions (started now for large transplants later!)
    Kale
    Broccoli

I've never grown this many herbs before.  Last year, the chickens had a hay day with a lot of things that got planted.  As well as the massive amount of rain and hail last summer.  It was not so great.  So we will see how this year's garden comes along.  I'm hoping to keep the chickens distracted with other things I will grow specifically for them.

Want to start some seeds??

Grab your seed starting medium.  I'm hoping to make some next year once I have a little more experience under my belt.  This year, I just grabbed a couple bags at the local nursery.  This was what they said they use and love.  Not certified organic, but the ingredients don't scare me.  I know it's called Ferti-Lome, but there is no fertilizer in it.  It's just fertile starter!  


You don't want to plant your seeds straight in this right out of the bag.  It needs a little bit of prep work. You are going to want to get it moist, but NOT wet.  Does that make sense?  It should feel damp.  The easiest way I have found to do this is to dump a good amount into a large bowl with some water.  Then use a spoon or your hands to mix the water into it.  The water takes a little bit to soak in.  Give it a few minutes before you add more water to it.


Nice and fluffy and moist.  That's all the prep that is needed.  It's all set to put into your containers and plant your seeds!  I started these seeds in some flats. I filled the flat about 3/4 full with the seed starting medium and flattened it so it was all even.  Next, I put the seeds out in rows and labeled with little wood markers. Cover with more seed starting medium and press down lightly.  Take a spray bottle of water and give it a good spritz all over.  Then cover your flat with a lid or some kind of clear plastic. (maybe even ceran wrap!)


Put it in a spot that gets lots of sun!  This is giving it a little greenhouse effect.  Warm and humid.  You don't need to water it while it is like this.  Once you see sprouts, take the lid off and water as needed.  (With your spray bottle, no need to drown em)  This year for Christmas, the hubs bought me a heating mat!  I'm really happy with the results so far.  Last year, my plants got really leggy.  Reaching and stretching for the heat from the sun.  They weren't strong at all.  This heats them from the bottom so they don't need to reach and stretch.  

Here are my little seedlings after just a week!


Happy little seedlings.


Wednesday, January 15, 2014

Crayon Remover!! - Lemon Oil

Our featured oil this month is LEMON!  If you missed the first feature of lemon and the best all purpose cleaner around, you can read it here.

A real EVERY day use I have found is to use it as a hand sanitizer.  Let me tell you!  With all the diapers I change and chickens and a puppy running around.  I use it EVERY day.  Lemon is a natural antibacterial.  I just put a drop on my hands, and the kids' hands, and rub em together.  It's good to keep a bottle in my purse for on the go situations.  :)  

Another "everyday" use for lemon oil is removing crayon from furniture! 


And it's, of course, so easy to do.  Drop one to two drops of lemon onto your rag, and rub onto the crayon mark.  It disappears!  Like magic!

Now you see it……


Now you don't…..


Since it was a little dirty anyway, I gave the whole thing a wipe down with my lemon all purpose cleaner and it was good to go!

I might just go room to room wiping off any spots on see on the walls.  :)  Great little "magic eraser" without all the gross chemicals!

As well as drinking it a glass of water a day, we are all lemony fresh!  

*You can order your therapeutic grade lemon oil from Young Living directly, or email me and I can get some shipped to you! (paterson.shannon@gmail.com)*

Tuesday, January 14, 2014

Party Season

It's that time of year!  Birthday parties like crazy with a few other things thrown in.

Nathan's party is first and coming up this weekend!  February is Allie's birthday.  Usually we throw a Superbowl party as well but not this year. A baby shower for a dear friend instead is WAY more fun!!  March is St Patrick's Day (which we have lots of fun celebrating-more on that in March) and Kelsey's birthday!

First things first - Nathan's party!

Last year was a really fun Super Mario Brothers theme.  It was REALLY fun planning the games and decorations for this one.   So here are some quick photos in case you know someone who needs ideas!

The cake - AKA the main event:


This is an OLD Wilton cake pan I found on Ebay.  I was so excited to find it and loved decorating it.  (Horrible lighting and an Instagram picture was all I got of it.)

My favorite decoration:


White balloons and the hubs drew the ghost faces for me.  They are taped to the ceiling with fishing line so they really looked like they were floating.  


Again with the not so great photo, and after everyone left.  But this was the favor table.  The Game Over sign also says "Thanks for playing!"  And I made the yellow question mark blocks and filled them with chocolate gold coins.  

Some games we played were:
Yoshi's Egg Smash!


I blew out the eggs and let them dry out.  Next they were colored and filled with confetti.  To close the confetti in, I glued a white paper circle over the hole.  

Then the kids smashed them. Throwing them at a target on the garage door.  It was SO FUN!


We also did a Goomba Stomp: Balloons made to look like Goombas and each they had to stomp on them!


Treats and fun were had by all. 


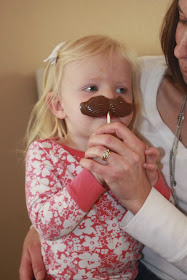
*chocolate Mario Mustache*

This year, Nathan wanted an AIRPLANE themed party.  It was a little more difficult for me so we'll see how it all pulls together!  But really, the most important part is that he enjoys his special day and feels celebrated.  I know he doesn't care so much about all the little details.  They're just fun for me!  :)


Friday, January 10, 2014

Our Quiet Corner and FREE Printables

I've been working on getting the house more organized and it is making me oh so happy!

I'm starting with the kids' rooms-and more specifically, the girls.  I've been having the hardest time trying to figure out how I want things sorted and organized.  I have anywhere from 3-5 kids (ages 6 and under) during the week.  I want things accessible but not always out.

My first project to tackle with this in mind was BOOKS.  We adore books in this house.  We have so many books.  Without a designated book spot, just a couple shelves in the bedroom, it was getting out of hand and the books were getting beat up.  :(  Poor sad books.

I bought some spice racks from IKEA to set up in the girls room as tiny bookshelves. They are perfect for night time.  A few books in the bedroom that can be swapped out weekly.  Love it, but it was not enough.


I decided to bring their toy shelf cubby thing from Target out to the living room.  The perfect spot was in the corner.  Between the back door and side window.  Lots of sunshine, which is one of my favorite things about reading-snuggling up in the warm sun with a good book.  And plenty of space.  It fit perfect! Not all of our books would fit but a decent amount, so I was happy.

Now to add little details.  I do have the books somewhat organized so it's easy for the kids to find what they are looking for.  Easy readers, Mom and Dad read aloud, bibles and bible stories, classics and board books.  The basket on the side holds our library books.  To encourage independent reading, I put out some of our favorite lovies to be read to.  I also put out some quiet activities to keep hands busy while listening to read alouds. Some puzzles and blocks.


Even with the cubby there, the wall was looking pretty bare.  My good friend gave me the cutest picture that says "Enjoy the Simple Things".  I know she gave it to me for our master bedroom but it went so perfect right there above books, puzzles, and blocks.  :)  Then I browsed Pinterest for some printables.

I fell in love with these two bible verse printables.  I love that our children will have God's word to read right there, breathing life into them.


You can print this one for yourself here.  A black and white version is available as well.


You can get this one here.

I printed them on nice card stock and stuck them in some big white frames we had. I love the color these bring to the wall.  They make the books stand out more too.  

Now I just need to find a cute child size rocking chair and it will be all finished. I can bring my focus back to the girls' room.

How are your resolutions/goals for 2014 coming along?  Have you started any?


Wednesday, January 8, 2014

Oil of the Month - Lemon

One of my goals I recently added to my list for 2014 - because it clearly was not long enough - is to learn even more about essential oils (especially ones we haven't used yet!) and use them in more of our daily routines for their health benefits.

I thought I would feature a different oil every month and through out the month show different ways we are learning to use them.

So for January:  


Lemon!  Oh lemon, how I adore you! 

Here is a little background info on it straight from the Young Living website:
     
"Lemon (Citrus limon) has a strong, purifying, citrus scent that is revitalizing and uplifting. Lemon consists of 68 percent dlimonene, a powerful antioxidant. It is delightfully refreshing in water and may be beneficial for the skin. Lemon may also be used to enhance the flavor of foods. Lemon essential oil is cold-pressed from the rinds of lemons. Jean Valnet MD estimated that it takes 3,000 lemons to produce one kilo of oil. In his book, The Practice of Aromatherapy, Valnet wrote that lemon is a tonic for supporting the nervous and sympathetic nervous system.* Lemon has an approximate ORAC of 6,619 (TE/L). TE/L is expressed as micromole Trolox equivalent per liter."

Since it's great for supporting the nervous system, I'm just going to drink my glass of water with a drop of lemon in it!  :)  It makes water so much more appealing considering you should drink at least EIGHT cups a day.  Seriously….eight??  Who does that??  ;)

I have a few FAVORITE ways to use lemon. Yes, in my water is one way, but another one is as an all purpose cleaner.  It's the best cleaner I've ever used.  I'm not even exaggerating.  Seriously. The Best. The End.

Lemon is a natural disinfectant and antibacterial.  Everything you need for cleaning counters and what not.

All you need is a glass bottle with a spray nozzle, lemon oil (therapeutic grade) and water.

*Glass is important because oils in plastic will cause the plastic to leach nastiness.* and clearly I should have sprayed the table to get that gunk off before taking the picture.  ;)

I saved a sparkling water bottle and a spray nozzle off store bought cleaner forever ago.   It fits the bottle almost perfect.  

This bottle is 25 oz.  Add 10-12 drops of your lemon oil and fill the bottle with water.  Put the top on, give it a good shake and you are good to go!

I have a before and after of the kitchen sink.  Be warned, the before has some nasty gunk stuck on.  All I did was spray just like normal all purpose cleaner and gave it a wipe down with a towel.  No serious elbow grease needed.  

Prepare yourself to be in awe of the cleanliness. 

Before: 


Umm GROSS!  It was stuck on good.

After:


Amazing!!  And seriously, just wiped it with a towel.  No sponges for scrubbing or anything.  The hubs even said, "Man, it's so shiny.  You didn't do anything special?"  

Nope, it's all in the lemon.

Nice and sparkly!  

You can order your lemon essential oil off the Young Living website or you can email me and I can get some shipped to you! (paterson.shannon@gmail.com) 


Sunday, January 5, 2014

Making Natural Yeast Starter

I might as well apologize now because this is going to be lengthy!

Switching over to much less processed foods was something we decided to do last year.  It has helped us in so many ways health wise and I don't see us ever going back.  

Once you learn some of the things about processed foods, you can't unlearn them…..  

The hubs and I have both always enjoyed baking our own bread but used to just do it for fun.  After researching and reading for the best kinds of breads we can make for our family, I came to natural yeast.  This book, The Art of Baking With Natural Yeast, has been a great resource for recipes and the "whys" of using natural yeast in your home.  As well as this book called Nourishing Traditions.  If you don't own these, add them to your list!


Here are just three benefits to using natural yeast as opposed to store bought, quick rise.  (which is FINE, if that's just easier for you.  But hopefully after reading this you'll see how easy-time consuming, but easy- it is to make your own yeast full of health for you and your family!)

1.  Natural yeast breaks down harmful enzymes in grains.
2.  Natural yeast takes the nutrition in grains-the ones your body craves-and makes them easily available for digestion.  
3.  Natural yeast converts dough into a digestible food source that will not spike your body's defenses.  It predigests SUGARS for diabetics, breaks down GLUTEN for the intolerant, and turns calcium-leaching phytic acid into a cancer-fighting antioxidant.
                           *these are taken from the book Art of Baking With Natural Yeast

And these are just the first three that are mentioned!  There are so many more.  I could just quote the book word for word on all the goodness.  Many, many delicious recipes included!

Natural yeast - a super hero in the world of baking with whole wheat, I tell ya!!

So how to find and make natural yeast!  Get that goodness in you!  Wild yeast is all around us.  They can be captured by adding organic grapes, apples, rye, wheat or even juniper berries with water and flour and allowing the mixture to ferment and grow.  Yep, it's alive!

It is its own little ecosystem in a jar.  The lactobacilli and wild yeasts feed on the sugars that are in the flour and break down things our body can't, including gluten.  While eating, it releases carbon dioxide, making little bubbles.  This is what causes your bread to rise.  As you make starter, you will see that sometimes a brown liquid forms on the top.  The is made of ethanol and acetic acid.  This DOES NOT mean your starter is ruined.  Your starter is fine.  Pour it off and stir.  Or some people just stir it right back in.

Ok, that was quite a mouthful of information. But great to know!  

The easiest way to make your own natural yeast is to use some flour! 

You will need:
flour
filtered water
jar
cheesecloth (optional) 

We use organic whole wheat.  (This process does take quite a bit of flour)

It doesn't matter the amount you start with.  I used one cup but you could do a half or even a quarter cup.  I wouldn't go above a cup because that will use a ridiculous amount of flour at feeding time and a very large container! Your jar will need to be big enough for your mixture to double in size.

Put an even amount of flour and water in the jar.  Stir well to combine.  Should be a thick pancake batter consistency.  Stir it three times per day until bubbles form.  (It is very helpful to do this at meal times because it's easier to remember.  Breakfast, lunch, and dinner.  Keep it on the counter right where you prep meals so you see it!) Keep it on the counter top covered with cheesecloth or loosely with a lid.  We never had luck with a lid because it didn't get enough air.  Cheesecloth works great!  Bubbles forming depends on how fresh your flour is.  The more fresh the flour, the faster your bubbles will appear.  It will probably take about 12 -24 hours.  

Once the bubbles appear, you need to start feeding it.  It eats flour and water.  Feed it once per day.  Remove half and replace it with the same amount of flour AND water.  Continue to stir three times a day (feeding it counts as stirring)  Wait for it to start expanding.  You need to feed it this way daily until it can double its size in 12 hours or less.

Now you will feed it once per day at a ratio of 1:2:2.  Stir it down and measure out your starter.  I measure out a cup.  Dump out the rest, it's not quite ready to cook with.  Put the cup back into the container (does't need to be cleaned) and feed it double the amount of starter.  One cup starter will be fed 2 cups flour and 2 cups water.  Stir well to combine.  Feed it this way once per day until it can double in 12 hours or less again.  (This only took ours one feeding) (No need to stir three times a day anymore, let it do it's thing.)

Now comes the part where it takes a lot of flour.  You are going to feed it twice per day for a week, the same way you feed it above.  The goal is to get it to double in 8 hours or less.  This means you have a healthy and active starter that is ready for baking.  It can happen in less than a week, but don't be discouraged if it doesn't.  Give it the full 7 days if it needs it.  


Now you can bake with it or stick it in your fridge!  It slows down growing in the fridge and only needs to be fed once a week.  We usually bake with it, (feed it after using it) and stick in the fridge for the rest of the week. It will last you as long you continue to feed it.  I forgot to feed it one week and panicked that I killed it.  Took it out and fed it.  And it was FINE.  They are pretty resilient so don't stress about it.  You will know that it's dead if it's starts growing mold.  The tangy sour smell (like sourdough bread) is normal and what you want.  

Enjoy your starter and delicious, HEALTHY bread!  Your starter can be split and shared with friends too!  All you need is a quarter cup to keep it going.  So split it and share the love!  :)

And make yumminess like these whole wheat cinnamon rolls…….


Wednesday, January 1, 2014

Happy New Year!

From our family to yours…….